Thursday, July 27, 2017

Attitude Adjustment Trip

The hubby and I severely needed an attitude adjustment and we decided to run away and go see some sights, none of which I had seen before, some of which he had not seen, and some he was excited to share with me. I'm posting one day of the trip each day. I'm writing this mostly for me, as sort of a journal. You're welcome to read if you are interested in comments and pictures, though!

Day One - Wyoming, Black Hills, Crazy Horse and Rushmore at Night

We took off in the morning, delivered our dogs to our DIL's house, then headed back towards the house because a couple things had been forgotten. That was ok, because we had to head back this way to start the trip. We contemplated dropping the dogs off the night before, but he worked and I had a show, so this just seemed the best solution.  The first thing we laughed about was the electronic highway signs in Utah and Wyoming that day. They read: Buckle Up Buttercup. Cute.


We stopped for breakfast in Evanston, meandered our way through Wyoming, including a stop at the famous Little America stop. We got there just as a bunch of youth landed there having been on a "trek". (It's common in the summer around here for the youth to go on a short reenactment of the Mormon pioneers coming to Utah, finding out what it's like to pull a handcart, wear period clothes in the hot summer sun, etc.) It was busy, we waited patiently for restrooms, bought a couple of food items, then headed back out on the road.  (Ignore the dirty windshield. If I'd have stopped to take EVERY picture we wanted, we would still be trying to get home!) As we traveled along we saw lots of antelope and we stopped to get a decent picture of at least one. We also laughed at a horse, standing next to an open garage with his head inside. "What ya doin', mom?" (Passed by too quick to get a pic.)


Internet was very spotty... little did I know! When we stopped for gas still just outside of S. Dakota, we figured we could be in Rapid City by end of day, so I started looking for a hotel room. We didn't plan this trip "down to the last detail" because we wanted some flexibility. I signed onto the chamber website and reserved a room, and we took off. Due to the internet being bad, I couldn't ever sign in to check the confirmation. Crossed fingers.

It was interesting as we started moving into the Black Hills just how different the landscape would become.  We saw several places where there had been fires in the past. I haven't researched to find out when they were through this area, but you could tell it had been a couple of years. It's amazing how the scars of a fire leave their own beauty behind.


We had thought about stopping at the Wind Caves in this area, but it was very apparent we weren't going to have the time, so that became the first "casualty". No problem, though.  Crazy Horse Monument became our first "official" stop.  The people who work at this park are very proud of it. Talking to them was a big part of the experience. This is not a national park, and is completely funded by the donations they get, and the entry earnings, etc from visitors.


We got there in time to take the last bus tour to the base of the monument. Our bus driver/guide was knowledgeable, had a great sense of humor and made the trip worth taking. We learned that the "crown" you see on the top of the head of Crazy Horse is used for "pointing", one of the methods used to know where to carve. Of course laser mapping is being used more and more but they will still use the pointing method from time to time.


Where this rectangular scaffold is around the white slab of rock is where his finger will be pointing.


They have placed a stone at the base that has the same "finish"
on it that the whole sculpture has/will have at the end, so you can 
feel what it is like.


Our tour guide giving some great information


We noticed on the map we were given that they had a memorial to the events of Sept. 11, 2001. It looks like they have carved granite from the area in the shape of the towers, to frame a memorial plaque and mount what may be a piece of the trade center. (There was no information on that so I'm not sure, it's just what it looks like.)


This beautiful sculpture of horses was nearby.


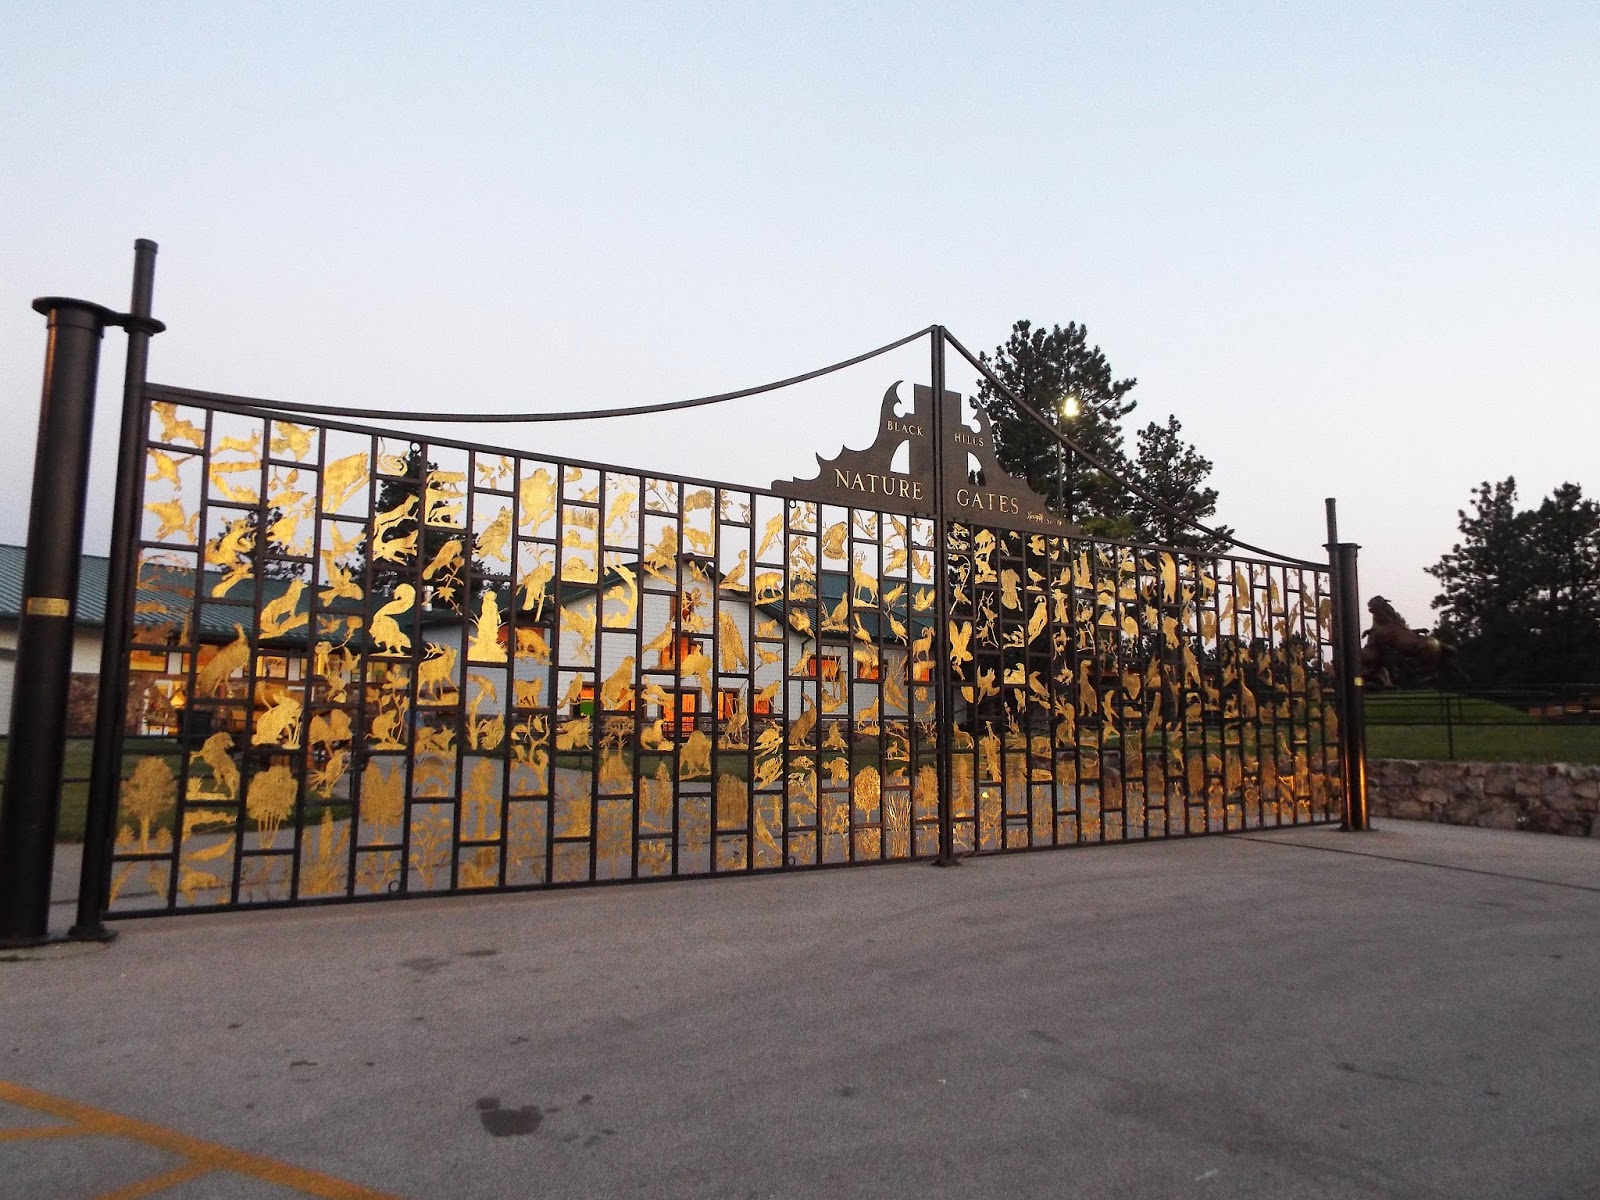
There is an interesting gate on the property. It doesn't go anywhere, you can walk all the way around it, but it has artwork of animals all over it. I collect beavers, the hubs collects foxes so I had to take pictures of these. I think the fox feels a little outnumbered.

Mr. Fox
Busy Beavers

Another beaver
Beaver

I do seed beading, and I design a few seed bead patterns every now and again. When I walked into this room, I was immediately covetous of this collection. Oh. My.


The explanation of where the beads came from

Beautiful bead work


Now, there ends up being a bit of a funny story. I really wanted to find where the finished sculpture is of the monument. The hubs needed the little boys room, so we split up... not even a room apart. We weren't going to stay for the light show, it was getting late and we wanted to get on the road and the gift shop where we were needed to turn the lights off for the light show. Somehow, he slipped right past me and outside and into the crowd. I stayed toward the back, trying to see him, taking a few pics. Of course, this was also where the sculpture was. I was hoping to take a pic of it when the lights came back on but... my batteries  died and my case was out in the car!!

Crazy Horse lit at night

So this is the only picture I got of the whole sculpture, in very low light. And the only pic of the laser show that came out clear, lol!


After the laser show was over we found each other and made our way to the car and on to Mount Rushmore. We both really wanted to see this monument lit up at night. Though the hubs had been to Rushmore, he had never seen it at night. At this point, my phone was getting NO internet, though the hubs phone, the same model I have, would manage to get it whenever signal strength for phone service was good. We were worried about confirmation at the hotel, so we didn't stay too long at Rushmore. I'm so glad we went!! My camera didn't really capture the beauty of the sculpture all lit up. There were very few people there, it was late enough that there was no one at the gate to charge for parking. It was worth the extra time.


Though we had a bit of a scare when the lady in front of  us at the hotel check in had messed up reservations, ours had gone through and we stopped for the night, sometime around 11:20. I tried getting T-Mobile to reset my phone, but it didn't work for long and we found out the next day there is a tech issue with their towers and 4G, so I "get" to go into a store and get my SIM card replaced. Made for an interesting trip during the day, but, hey!! I was having fun!

Friday, July 29, 2016

More Adventures with Silhouette Sandblasting

I'm still playing with designs and sandblasting. I mentioned in the last post that I was doing a couple of bottles with designs in them. So here are pictures of the two that I did. I will be doing more for sure! I really need to get my hands on more cobalt bottles, I love the way the blast shows up against the background!

I've mentioned the wedding plates. I had three wedding plates to do, and I had a couple of projects I needed to do that required a french vanilla glass. This glass is fun to play with and gives a great chemical reaction with some other glasses. I have limited funds due to losing about 6 weeks of work due to a broken arm (just below the elbow) so I think, no problem! I'll just get a sheet of french vanilla and do the wedding plates out of that. One problem I should have foreseen but didn't; the sandblast of the names and wedding dates didn't show up very well. It would have been useful had I decided this before I took the mask off, paint them to highlight and no problem, right? But of course, I'm always running faster than my brain can think, and I'd already removed the mask so I needed to figure out how to fix this. The first plate I used a low fire paint, but because of the technique used on the plate, the plate face is a bit rough, so it wasn't just a matter of putting the paint on and then wiping it off on the "smooth" areas, leaving it in the sand blasted areas. I did my best to clean up the outside areas, but I felt it came out very uneven. (No picture).


For the second wedding plate, I didn't have a chance to paint it before I left to sell at a farmer's market, and when I got home, I was too tired to try and do that kind of small hand work. I needed to deliver the plate the next day. I wondered if Pebeo paints would work. I checked my stash. I had the perfect color, but it was so old it wasn't good. I thought, ok, I could run to the store in the morning, paint it, and it would only need to be baked in the oven for 30 minutes and I could make the time schedule. I run to a local store only to find out they no longer carry the regular Pebeo paints, only those with special effects like mottling. Oi. (Notice how this only happens when you are facing a deadline?) With the help of a sales clerk I found a Martha Stewart paint that doesn't require firing, the paint cures on it's own in 21 days, even to the point of being dishwasher safe on the top rack. I also picked up some Rub N Buff for future experimentation.  So, I am happier with the results, and I have one more to do, but I will try one more experiment plate that I will hopefully remember to paint before I take the resist off. I plan on incorporating more of this in my work!                                                                            

Sunday, July 24, 2016

Taking it to the Next Level Using a Silhouette Cutting Machine

A few months ago, I bought a Silhouette Cameo package. The main reason I bought it was because I had been following an artist who started using the Silhouette to carve/emboss metal clay. I'm not a scrapbooker, but this use of a cutting machine intrigued me.

I had first become aware of these types of machines several years ago with the introduction of Cricut. I was intrigued, but at the time, you had to buy cartridges that contained designs in order to cut them. I like the idea of using Celtic designs (obviously) but I couldn't seem to find any Celtic style cartridges and wondered if it would be worth the investment. Later I heard about the Silhouette and that it came with design software so you could make your own designs. I kept on investigating both machines and learned that after a time, Cricut also came with software to design your own images. Cool. Cricut then introduced a wireless version. (Silhouette's Cameo 3, due out this year is also now wireless.)

Then I saw what Wanaree Tanner was doing with metal clays and the Silhouette.  Her artistry is amazing. (You may want to look through her other videos on YouTube). This is the direction I want to head. By the time I contacted Wanaree, she was no longer teaching the technique but she directed me to Cindy Pope and her classes on CraftCast. I still didn't have a Silhouette, but I signed up for the class last November. The rates for these classes are very reasonable. One great thing about CraftCast is that you have a link to the class you can go back to and rewatch over and over. Good thing! I enjoyed the class and I am still learning from watching it.

Business cards cut with Silhouette
So, I got my machine and started playing with it. The software has a bit of a learning curve, and I'm learning as I go. I cut out a small stencil with it and used it to sift powdered frit onto a glass pendant. No picture, the pendant didn't turn out because of another element I added to it, but the stencil worked great. Then I decided to play with my business cards. I had changed my business cards a couple of years ago to a) stand out and b) use them to tag my jewelry with. I had been using a punch I found from a craft store. I loved the shape, but the size I had was just a bit too small. I bought the bigger size, but it was just too big, and I never used it. So, I printed out my business card sheet, found a similar shape of tag in the Silhouette design store and made it just a tiny bit bigger than my prior cards. Very happy with it! I still haven't explored the print and cut option and making use of the registration mark feature, which may actually make it easier to do this, but I do plan on it, and for now, this works!

Wedding Plate
At the Glass Expo in Vegas this year I took a class on adding images with sandblasting. Combined with my Silhouette, this is going to expand my designs in an amazing way! I had already been doing something as a gift for my friends that I call my Wedding Plate. I get leaves from the garden they got married in or held their reception in, used the Fossil Vitra technique to "emboss" those leaves into a glass plate, then etch their names and wedding date onto the plate. I played around and found I could get a fairly decent resist using the Silhouette and it's stencil material. So not only could I blast the wedding plates, I could do some fun dichro designs as well. So I made sure I added a sandblast cabinet to my toys.

There are two different types of stencil material, one a harder stencil like you would use to trace or paint through that I've picked up from the local hobby store, and the soft stencil material that has a sticky back to be positioned and act like a resist which is a Silhouette brand, so you need to plan accordingly. Keep in mind, I've only been playing with the sandblast part for about a month, but I am so happy with it, and I'm learning continually!

Silhouette "stencil" material on dichroic glass
as a resist, then sandblasted

I've got some flattened wine bottles I plan to sandblast this week (I'm waiting for more resist to come in!) and if I can get myself organized, I'll post pictures of those later on.

Sandblast using Silhouette "stencil" material.
First line from a Robert Frost poem.


As far as some great resources I've discovered, one is Silhouette School which has both video and written tutorials and often posts great project ideas. Written with a lot of fun and a sense of humor. She has written several great ebooks on how to use specific features as well.

Another great resource is a series of videos on YouTube called "Tracing Without Tears". Great info on how to transform pictures, etc. into items you can cut on your Silhouette. I highly recommend both resources!


Wednesday, January 7, 2015

Challenge Day 7

So, I guess I'm hitting about 50% so far on these challenges. I am trying to also get my regular inventory up, including at least 60 pair of earrings (and I'm only half way on that, too!) and with all my "regular" duties it's been difficult to set aside the actual time to do the challenge.

I also have to admit I was a little intimidated by the challenge for Sunday, Monday and Tuesday which were all do 5 drawings spending no more than 5 minutes on each one. I still may try this somewhere along in the challenge.

Today's challenge was to use/create a tool that isn't a tool made for glass. Now this intrigues me. My challenge all along has been that I can't draw, so creating pictures is difficult for me. I love playing around with Celtic knots however, and mulled over what could I use that would help me draw knots? Someone had posted a video on the challenge Facebook page of some Tibetan monks making a sand drawing. It didn't show the tool they were using very clearly, but I wondered what kind of control I would get if I could roll up a piece of card stock and have the frit come out of a small hole in the bottom? While this may not technically be sgraffito style, I think it's what I need and it is still in the spirit of the challenge.

I am REALLY pleased with the results, because I think this is something I can use in the type of "drawings" that I like to do, more geometric shapes, etc. I really liked the control it gave me (just tapping on the side with my finger), and I used a toothpick to clean the spaces up a bit. I have a color shaper that I think will work maybe a little better for clean up, but I left this one like it was so the rules were followed. In looking at other posts on the wall I saw that someone carved/sharpened an eraser and used it. I may try something similar for tomorrow's challenge; I'm thinking something smaller and maybe skinnier than my color shaper to get into small spaces with. I've used a piece of card stock just folded in half before to get detail, but I think I like this MUCH better!

The lesson for me today was to go ahead and try to use this challenge along with MY style as much as I can, make it work for MY glass pieces. It is kind of fun! Three of my challenge pieces are firing away in the kiln right now so that I can make adjustments to thickness if needed. If they turn out I'll post pictures tomorrow.

Design by Duane Miles, beaded by Kerry